VPSで独自ドメインを使用したメールサーバ構築
VPS(CentOS release 6.10 (Final))をメールサーバにし、来たメールをGmailに転送する設定を行ったメモ。OP25B設定でspamメールやvirusメールの送信を抑制する。
目的
さくらVPSでpostfixとdovecotを使用して、独自ドメインを使用したメールアドレスを作成した時のメモ。 VPSをメールサーバにしてメールの送受信を行う。
- 独自ドメインでVPSにメールサーバを構築する
- 独自ドメインに届いたメールをGmailに転送する
結果
作成するメールサーバ構成
| OS | CentOS release 6.10 (Final) |
| SMTPサーバ | Postfix |
| POP/IMAPサーバ | Dovecot |
| 転送メール元 | webmemo@webmemo.tokyo |
| 転送メール先 | webmemo@gmail.com |
| その他 | さくらVPS2Gプランを使用している。 |
使用ソフトウェア:以下
[root@xxx xxx]# rpm -qa | grep "postfix\|dovecot\|cyrus-sasl"
cyrus-sasl-plain-2.1.23-15.el6_6.2.x86_64
cyrus-sasl-2.1.23-15.el6_6.2.x86_64
cyrus-sasl-lib-2.1.23-15.el6_6.2.x86_64
postfix-2.6.6-8.el6.x86_64
dovecot-2.0.9-22.el6.x86_64
cyrus-sasl-devel-2.1.23-15.el6_6.2.x86_64
iptablesの結果
[root@xxxx xxxx]# iptables -nL
Chain INPUT (policy ACCEPT)
target     prot opt source               destination
・・・省略
ACCEPT     tcp  --  0.0.0.0/0            0.0.0.0/0           tcp dpt:25
ACCEPT     tcp  --  0.0.0.0/0            0.0.0.0/0           tcp dpt:110
ACCEPT     tcp  --  0.0.0.0/0            0.0.0.0/0           tcp dpt:143
ACCEPT     tcp  --  0.0.0.0/0            0.0.0.0/0           tcp dpt:587
・・・省略
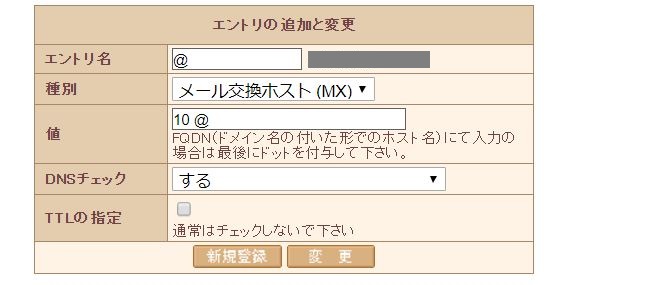
DNS MXレコード設定
さくらで取得したドメインに作成したMXレコード
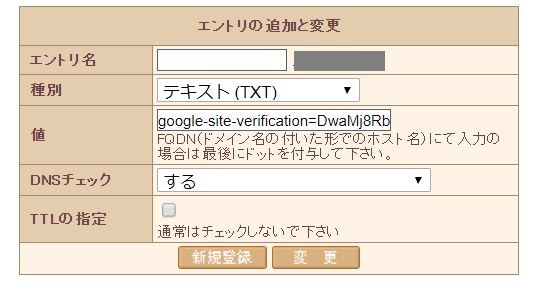
Gmailに送信するために作成したTXTレコード
SMTPのサーバ(Postfix)の設定
[root@xxxx xxxx]# postconf -n
alias_database = hash:/etc/aliases
alias_maps = hash:/etc/aliases
broken_sasl_auth_clients = yes
command_directory = /usr/sbin
config_directory = /etc/postfix
daemon_directory = /usr/libexec/postfix
data_directory = /var/lib/postfix
debug_peer_level = 2
home_mailbox = Maildir/
html_directory = no
inet_interfaces = all
inet_protocols = ipv4
mail_owner = postfix
mailq_path = /usr/bin/mailq.postfix
manpage_directory = /usr/share/man
mydestination = $myhostname, localhost.$mydomain, localhost
mydomain = webmemo.tokyo
myhostname = webmemo.tokyo
mynetworks_style = host
myorigin = $mydomain
newaliases_path = /usr/bin/newaliases.postfix
queue_directory = /var/spool/postfix
readme_directory = /usr/share/doc/postfix-2.6.6/README_FILES
relayhost = [smtp.gmail.com]:587
sample_directory = /usr/share/doc/postfix-2.6.6/samples
sendmail_path = /usr/sbin/sendmail.postfix
setgid_group = postdrop
smtp_sasl_auth_enable = yes
smtp_sasl_mechanism_filter = plain
smtp_sasl_password_maps = hash:/etc/postfix/sasl_passwd
smtp_sasl_tls_security_options = noanonymous
smtp_tls_CApath = /etc/pki/tls/certs/ca-bundle.crt
smtp_use_tls = yes
smtpd_recipient_restrictions = permit_sasl_authenticated, reject_unauth_destination
smtpd_sasl_auth_enable = yes
unknown_local_recipient_reject_code = 550
POP3/IMAPのサーバー(Dovecot)の設定
[root@xxxx xxxx]# dovecot -n
# 2.0.9: /etc/dovecot/dovecot.conf
# OS: Linux 2.6.32-358.14.1.el6.x86_64 x86_64 CentOS release 6.10 (Final)
auth_debug = yes
auth_mechanisms = plain login
auth_verbose = yes
disable_plaintext_auth = no
mail_location = maildir:~/Maildir
mbox_write_locks = fcntl
passdb {
driver = pam
}
protocols = imap pop3
ssl_cert =
方法
フロー
1ポートの開放
↓
2DNSの設定
↓
3SMTPのサーバ(Postfix)の設定
↓
4Submissionの設定
↓
5POP3/IMAPのサーバ(Dovecot)の設定
↓
6メールアカウントの設定
↓
7動作の確認
↓
8転送設定
ポートの開放
メール制御をするために、以下のポートを開ける。
iptablesのファイルを編集した。
ポート番号 プロトコル 25 SMTP 110 POP3 143 IMAP 587 SMPT(Submission)
firewall設定として以下を追記した。
[root@xxxx xxxx]# vi /etc/sysconfig/iptables
# 以下を追記
-A INPUT -p tcp --dport 25 -j ACCEPT
-A INPUT -p tcp --dport 110 -j ACCEPT
-A INPUT -p tcp --dport 143 -j ACCEPT
-A INPUT -p tcp --dport 587 -j ACCEPT
iptablesに追記した値を反映させるために再起動
[root@xxxx xxxx]# service iptables restart
編集結果の確認
[root@xxxx xxxx]# iptables -nL
Chain INPUT (policy ACCEPT)
target prot opt source destination
・・・省略
ACCEPT tcp -- 0.0.0.0/0 0.0.0.0/0 tcp dpt:25
ACCEPT tcp -- 0.0.0.0/0 0.0.0.0/0 tcp dpt:110
ACCEPT tcp -- 0.0.0.0/0 0.0.0.0/0 tcp dpt:143
ACCEPT tcp -- 0.0.0.0/0 0.0.0.0/0 tcp dpt:587
・・・省略
DNSの設定
DNSにMXレコードを設定する。
画像はさくらで取得したドメインに設定したMXレコード
SMTPのサーバ(Postfix)の設定
※迷惑メールの不正中継に利用されずに外部から外部宛に送信できるようにするため、SMTP認証機能を有効にする。
(実際知らないIPからのアクセスがたくさんある...)
postfixを使うように設定変更
[root@xxxx xxxx]# sudo alternatives --config mta
1 プログラムがあり 'mta' を提供します。
選択 コマンド
-----------------------------------------------
*+ 1 /usr/sbin/sendmail.postfix
Postfix設定ファイルを以下のように変更する。
[root@xxxx xxxx]# vi /etc/postfix/main.cf
# ドメイン設定
# domain 追加をする
myhostname = webmemo.tokyo
mydomain = webmemo.tokyo
# 以下コメントアウトをはずす
myorigin = $mydomain
# 受信設定
# コメントアウトをはずす
inet_interfaces = all
# メールボックスの設定
# コメントアウトをはずす
home_mailbox = Maildir
# inet_interfacesの設定
inet_interfaces = all
#inet_interfaces = localhost
# SMTP認証の設定
# 最終行に以下追加
smtpd_sasl_auth_enable = yes
broken_sasl_auth_clients = yes
smtpd_recipient_restrictions = permit_sasl_authenticated, reject_unauth_destination
設定を反映させるために、postfixとSMTP認証(saslauthd)を起動。
# デーモンあげる
[root@xxxx xxxx]# service postfix restart
postfix を停止中: [ OK ]
postfix を起動中: [ OK ]
[root@xxxx xxxx]# service saslauthd start
saslauthd を起動中:
[ OK ]
# サーバ起動時に自動起動できるようにchkconfigもonにしておく。
[root@xxxx xxxx]# chkconfig postfix on
[root@xxxx xxxx]# chkconfig saslauthd on
Submissionの設定
OP25B(Outbound Port 25 Blocking)を行っていると、VPSのメールサーバーに接続することができず、メールを送信することができない。
そこで、メールソフトからの通信をSubmissionポート(587番)で受けるように設定することで、メールを送信することができるようにする。
[root@xxxx xxxx]# vi /etc/postfix/master.cf
# コメントアウトを外す
#submission inet n - n - - smtpd
# -o smtpd_sasl_auth_enable=yes
# -o smtpd_client_restrictions=permit_sasl_authenticated,reject
submission inet n - n - - smtpd
-o smtpd_sasl_auth_enable=yes
-o smtpd_client_restrictions=permit_sasl_authenticated,reject
-o milter_macro_daemon_name=ORIGINATING
[root@xxxx xxxx]# sudo service postfix reload
postfix を停止中: [ OK ]
postfix を起動中: [ OK ]
POP3/IMAPのサーバ(Dovecot)の設定
メールを受信するための設定をする。
メールを保存する場所は、/home/各ユーザ名/Maildirの下とする。
[root@xxxx xxxx]# vi /etc/dovecot/conf.d/10-mail.conf
# 以下の行を追加する。
# If you're using mbox, giving a path to the INBOX file (eg. /var/mail/%u)
# isn't enough. You'll also need to tell Dovecot where the other mailboxes are
# kept. This is called the "root mail directory", and it must be the first
# path given in the mail_location setting.
#
mail_location = maildir:~/Maildir
[root@xxxx xxxx]# vi /etc/dovecot/conf.d/10-auth.conf
disable_plaintext_auth = no
auth_mechanisms = plain login
[root@xxxx xxxx]# vi /etc/dovecot/conf.d/10-ssl.conf
ssl = yes
[root@xxxx xxxx]# vi /etc//dovecot.conf
protocols = imap pop3
Dovecotの起動と自動起動
[root@xxxx ~]# service dovecot restart
Dovecot Imap を停止中: [失敗]
Dovecot Imap を起動中: [ OK ]
[root@xxxx ~]# sudo chkconfig dovecot on
メールアカウントの設定
メールを各ユーザ毎に管理するためにユーザアカウントを作成する。
また、Dovecotの設定で記載したメールボックスも作成する。
アドレスは「ユーザー名@ドメイン名」
# ユーザアカウントの作成
[root@xxxx ~]# useradd webmemo
[root@xxxx ~]# passwd webmemo
ユーザー webmemo のパスワードを変更。
新しいパスワード:
新しいパスワードを再入力してください:
passwd: 全ての認証トークンが正しく更新できました。
# メールボックスの作成
[root@xxxx ~]# mkdir /home/webmemo/Maildir
[root@xxxx ~]# mkdir /home/webmemo/Maildir/cur
[root@xxxx ~]# mkdir /home/webmemo/Maildir/new
[root@xxxx ~]# mkdir /home/webmemo/Maildir/tmp
[root@xxxx ~]# chown -R webmemo:webmemo /home/webmemo/Maildir/*
動作の確認
この時点までのメール設定で、送受信できるか確認する。
# 送信テスト
[root@xxxx ~]# echo "本文" | mail -s "タイトル" -r webmemo@webmemo.tokyo webmemo@webmemo.tokyo
# newにメールが入ってくる
[root@xxxx Maildir]# ls -lR
.:
合計 12
drwxr-xr-x 2 webmemo webmemo 4096 9月 18 22:07 2019 cur
drwxr-xr-x 2 webmemo webmemo 4096 9月 18 22:17 2019 new
drwxr-xr-x 2 webmemo webmemo 4096 9月 18 22:17 2019 tmp
./cur:
合計 0
./new:
合計 4
-rw------- 1 webmemo webmemo 532 9月 18 22:17 2019 1568812627.Vfc03Ic24bc7M887243.xxxx.sakura.ne.jp
./tmp:
合計 0
転送設定
Posixの設定としてaliasesを編集する。
[root@xxxx Maildir]# vi /etc/aliases
# ユーザー名と転送先を記載
webmemo: webmemo@gmail.com
エイリアスの反映
[root@xxxx Maildir]# newaliases
[root@xxxx Maildir]#
参考
その他詳細
メールソフトの設定
設定項目 設定する値 SMTPサーバー メールサーバのIPアドレスまたはホスト名 SMTPサーバーのポート番号 587(OP25B対策) POP3/IMAPサーバー メールサーバのIPアドレスまたはホスト名 POP3サーバーのポート番号 110 IMAPサーバーのポート番号 143 ユーザー名 メール用に作成したアカウント パスワード メール用に作成したパスワード メールアドレス ユーザー名@ドメイン名
gmail転送設定
Gmailに転送設定をする際に以下エラーがでた原因はIPv6を使おうとしていたためということで、IPv4を使うように設定する。
connect to smtp.gmail.com[2404:6800:4008:c06::6d]:587: Network is unreachable
[root@xxxx xxxx]# vi /etc/postfix/main.cf
inet_protocols = ipv4
また、gmail認証を行う。以下から取得した文字列をDNS設定にてTXTレコードとして登録する。
https://postmaster.google.com/managedomains
google-site-verification=DwaMj8RbgX-inv-B9N0tElZNk82u23bCFqZQkXXXXXX
[root@xxxx xxxx]# vi /etc/postfix/main.cf
# using gmail smtp server to relay mails
relayhost = [smtp.gmail.com]:587
smtp_use_tls = yes
smtp_sasl_auth_enable = yes
smtp_sasl_password_maps = hash:/etc/postfix/sasl_passwd
smtp_sasl_tls_security_options = noanonymous
smtp_sasl_mechanism_filter = plain
smtp_tls_CApath = /etc/pki/tls/certs/ca-bundle.crt
ログインユーザー情報ファイルを作成する。
[root@xxxx xxxx]# vi /etc/postfix/sasl_passwd
[smtp.gmail.com]:587 xxxx@gmail.com:パスワード
/etc/postfix/sasl_passwd.db が生成。
# postmap /etc/postfix/sasl_passwd
# chown root:root /etc/postfix/sasl_passwd
# chmod 600 /etc/postfix/sasl_passwd
# chown root:root /etc/postfix/sasl_passwd.db
# chmod 600 /etc/postfix/sasl_passwd.db
# service postfix restart
gmailで信頼性のひくいアプリを許可する
ログの場所
メール設定を解析するためのログの場所
[root@xxxx ~]# ls -l /var/log/maillog
-rw------- 1 root root 1489182 9月 22 00:02 2019 /var/log/maillog
Devcotのデバッグ設定
Dovecotのエラーを詳細表示する。
[root@xxxx ~]# vi /etc/dovecot/dovecot.conf
auth_verbose = yes
auth_debug = yes
各設定値の確認方法
その他、メール設定確認用メモ
# Firewall設定で開けたポートからログインできるか確認する。
[root@xxxx ~]# telnet localhost 25
Trying ::1...
Connected to localhost.
Escape character is '^]'.
220 webmemo.tokyo ESMTP Postfix
[root@xxxx ~]# telnet localhost 110
Trying ::1...
Connected to localhost.
Escape character is '^]'.
+OK Dovecot ready.
[root@xxxx ~]# telnet localhost 143
Trying ::1...
Connected to localhost.
Escape character is '^]'.
* OK [CAPABILITY IMAP4rev1 LITERAL+ SASL-IR LOGIN-REFERRALS ID ENABLE IDLE STARTTLS AUTH=PLAIN] Dovecot ready.
# Postfix の設定のデフォルトと異なる設定を確認する
[root@xxxx ~]# postconf -n
# Dovecotの設定ファイルの場所確認
[root@xxxx ~]# dovecot -n | head -1
# Dovecotのデフォルトと異なる設定を確認する
[root@xxxx ~]# dovecot -n
# MXレコードの確認
[root@xxxx ~]# host -t mx webmemo.tokyo
webmemo.tokyo mail is handled by 10 webmemo.tokyo.
# 失敗したメール送信の確認
[root@xxxx ~]# postqueue -p
# キューをすべて削除
[root@xxxx ~]# postsuper -d ALL deferred